From Prompt to Test: A Guide to Playwright-MCP in Cursor
Writing end-to-end tests is crucial for ensuring application quality, but let’s be honest: it can be repetitive and time-consuming. What if you could describe a user journey in plain English and have a complete, runnable Playwright test generated for you automatically?
Welcome to the future of test automation. In this post, I’ll walk you through my experience using Microsoft’s Playwright-MCP (Multi-turn Co-pilot Protocol) directly within the Cursor IDE. We’ll go from a simple text prompt to a fully-fledged Playwright test that automates a real-world scenario.
The Power Couple: Cursor + Playwright MCP
- Cursor: An AI-first code editor designed for pair-programming with artificial intelligence. Its agentic capabilities allow it to perform complex, multi-step tasks based on your instructions.
- Playwright-MCP: A server that exposes Playwright’s browser automation capabilities through a set of tools that an AI agent (like Cursor’s) can use. It’s the bridge that allows the AI to see, interact with, and understand web pages just like a human would.
Together, they form a powerful duo that can revolutionize your testing workflow.
Pre-requisites
Before we start, make sure you have the following installed:
Step 1: Initialize a Playwright Project
First, let’s set up a new Playwright project. Open your terminal, create a new directory, and run:
npm init playwright@latest
Follow the on-screen prompts to configure your project. This will install Playwright and the necessary browser binaries.
Step 2: Configure Cursor for Playwright MCP
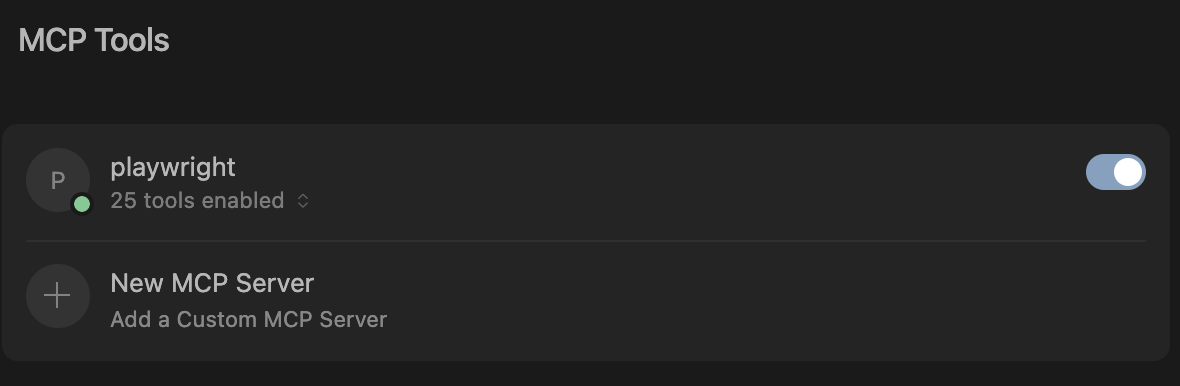
To allow Cursor to control Playwright, we need to configure it as a custom MCP server.
- Open Cursor’s settings (
Ctrl/Cmd + Shift + J). - Navigate to MCP Tools > “Add Custom MCP Server”.
- This will open an
mcp.jsonfile. Add the following configuration:
{
  "mcpServers": {
    "playwright": {
      "command": "npx",
      "args": [
        "@playwright/mcp@latest"
      ]
    }
  }
}
By default, this might try to use your installed Chrome browser. I prefer to use the specific Chromium binary that Playwright installed, as it guarantees compatibility. To do this, you’ll need to find the path to the Chromium executable. On macOS, it’s typically in a location like /Users/<your-username>/Library/Caches/ms-playwright/.
Here’s my updated mcp.json to use the specific binary:
{
    "mcpServers": {
        "playwright": {
            "command": "npx",
            "args": [
                "@playwright/mcp@latest",
                "--browser",
                "chromium",
                "--executable-path",
                "/Users/<your-username>/Library/Caches/ms-playwright/chromium-1169/chrome-mac/Chromium.app/Contents/MacOS/Chromium"
            ]
        }
    }
}
Note: Remember to replace <your-username> with your actual username and verify the path to the Chromium executable on your system.
Once you save mcp.json, you should see the Playwright tools loaded in Cursor.
Step 3: Crafting the Magic Prompt
Now for the fun part. We’ll write a detailed prompt that tells the Cursor agent exactly what we want to do. I saved this as a markdown file to reuse it easily.
Here’s the prompt I used:
- You are a playwright test generator
- Navigate to google.com
- search "pewdipiew"
- from the search list goto his youtube channel
- Then find his latest video
- Once done with these steps, generate a playwright test in /tests/ directory.
- The file name should not have any spaces, use "_" or "-" instead of space.
- Don't forget to add proper waits while generating the test.
- Close the browser.
Step 4: Let the AI Agent Work
With our prompt ready, we just need to activate Cursor’s agent and point it to our instructions.

Cursor’s agent will parse the prompt, understand the steps, and start using the Playwright MCP tools to interact with the browser. You can see it planning and executing each action, from navigating to Google, typing in the search box, and clicking on links.
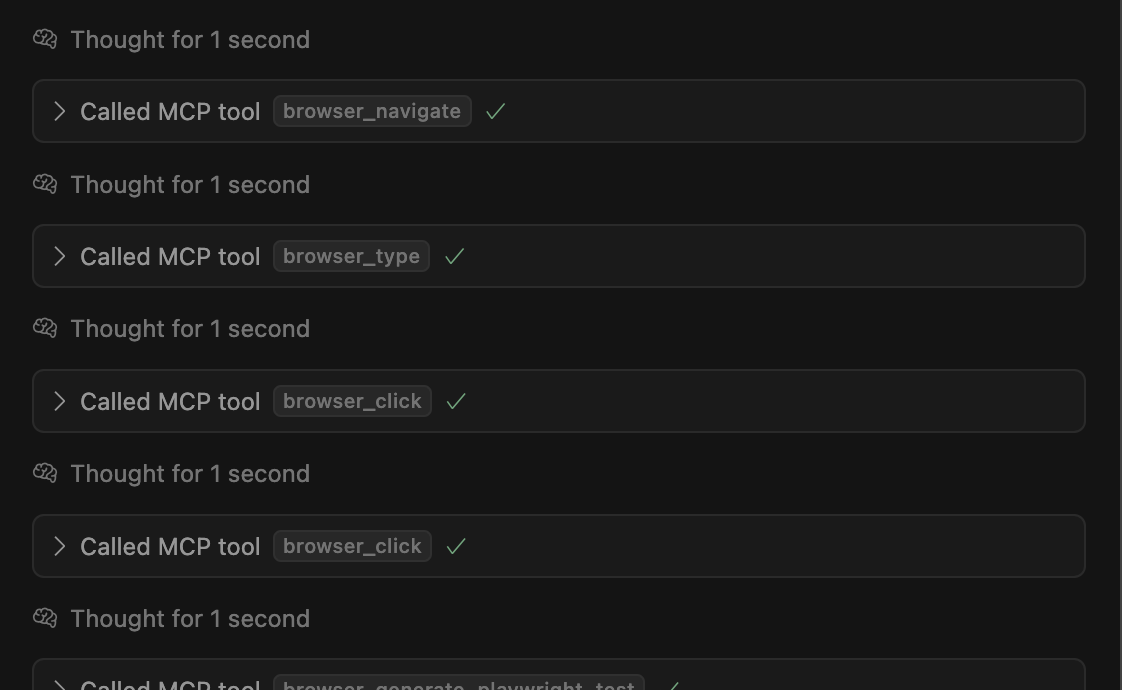
The Grand Finale: The Generated Test
After completing the browser actions, the agent follows the final instruction: generate the Playwright test script. It creates a new file in the tests directory with a descriptive name.
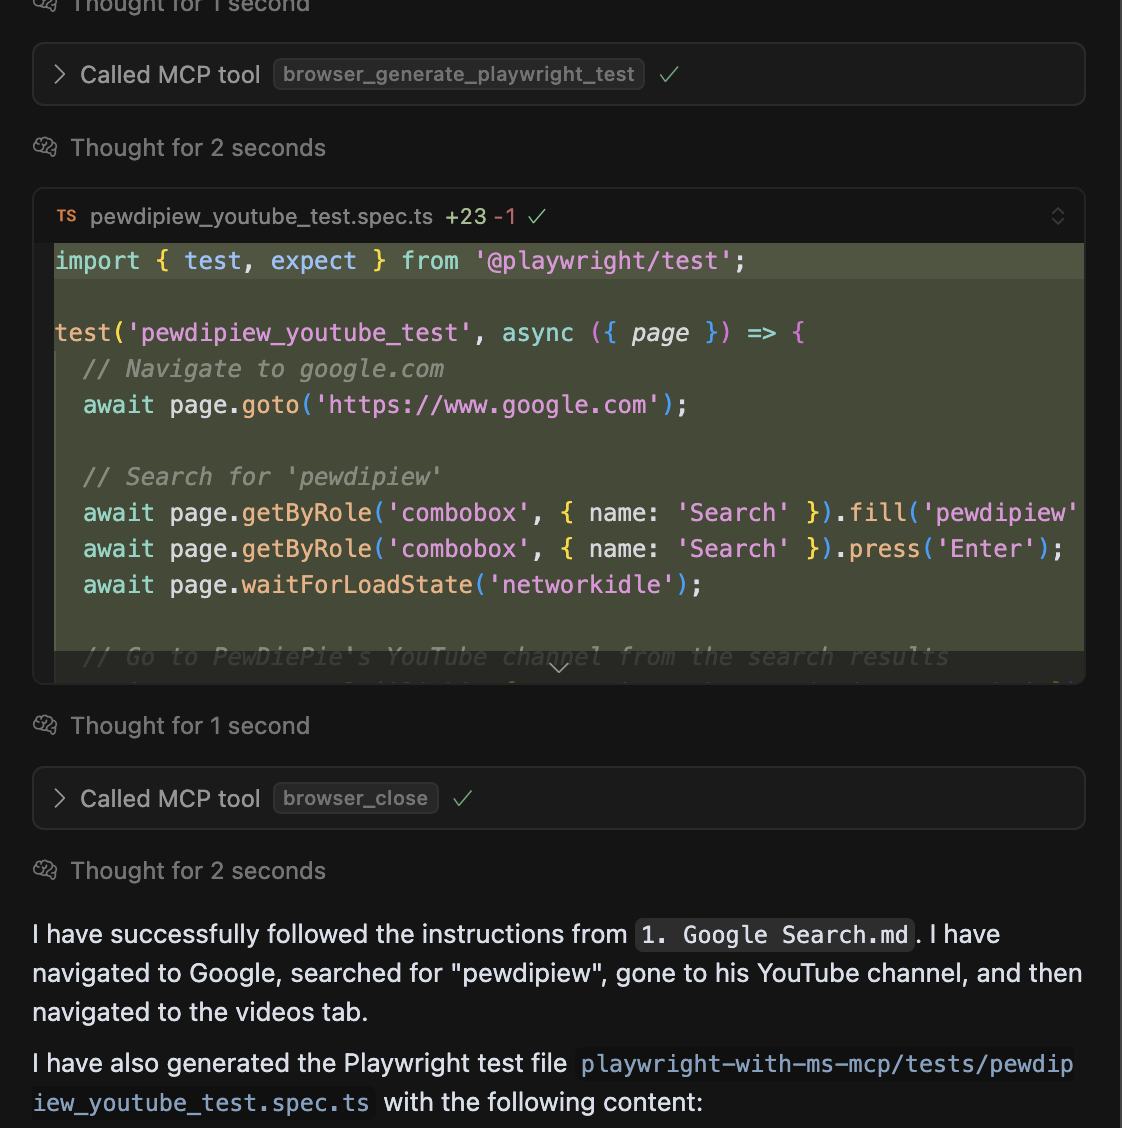
Here is the code it generated. Notice the descriptive locators, added waits, and assertions – all derived from my simple prompt.
import { test, expect } from '@playwright/test';

test('pewdipiew_youtube_test', async ({ page }) => {
  // Navigate to google.com
  await page.goto('https://www.google.com');

  // Search for 'pewdipiew'
  await page.getByRole('combobox', { name: 'Search' }).fill('pewdipiew');
  await page.getByRole('combobox', { name: 'Search' }).press('Enter');
  await page.waitForLoadState('networkidle');

  // Go to PewDiePie's YouTube channel from the search results
  await page.getByRole('link', { name: 'YouTube PewDiePie - YouTube' }).click();
  await page.waitForLoadState('networkidle');

  // Go to the videos tab to see the latest video
  await page.getByRole('tab', { name: 'Videos' }).click();
  await page.waitForLoadState('networkidle');

  // Verify that the latest video is displayed
  await expect(page.locator('h3').filter({ hasText: 'Presenting my Billion Dollar Plan...' })).toBeVisible();

});
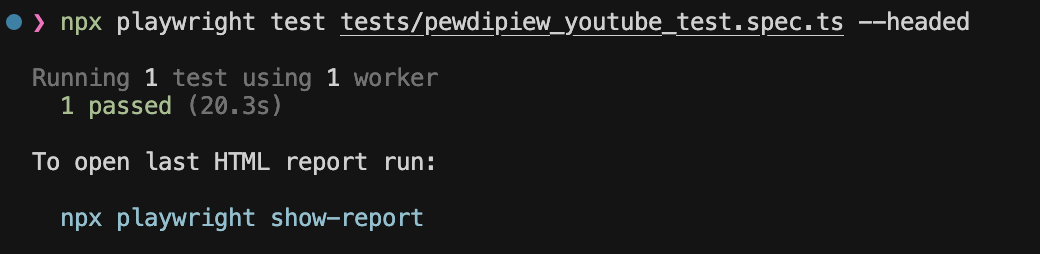
Verification: Running the Test
Of course, the proof is in the pudding. Let’s run the generated test to see if it works.
npx playwright test tests/pewdipiew_youtube_test.spec.ts --headed
And the result… a success!
Running 1 test using 1 worker
  1 passed (20.3s)

To open last HTML report run:

  npx playwright show-report
Conclusion: A Game-Changer for Testing
This workflow is nothing short of amazing. By combining the natural language understanding of an AI agent with the powerful browser automation of Playwright, we can drastically reduce the time and effort required to create robust E2E tests. It’s not just about speed; it’s about shifting our focus from writing boilerplate code to defining user behavior.
This was a simple example, but it opens up a world of possibilities for more complex test scenarios. I’m excited to explore more of what Playwright-MCP can do. Stay tuned!
You can find the complete codebase for this experiment here: https://github.com/imshaiknasir/experimental/tree/main/playwright-with-ms-mcp
Share this post
Found this useful? Let others know!